Once you digitize your photo library, the display options are endless.
Albums and photobooks
If you’re a traditionalist, there’s nothing wrong with the classic photo album. It’s certainly the best option if you’ve already got piles of printed photos. Two great sources for high quality albums are exposuresonline.com and albumsource.com. Look for page refills to ensure that you get the most space out of each album, and for the right sized pockets for your developed photos.
If you’ve got doubles, put together an extra photo album for each child. That way, they can have their own copies of their childhood to take when they leave the nest.
Nothing beats photobooks for making albums from your digital library. And if you’re already using a virtual server to store your photos, you save the time and hassle of uploading your photos.
Sites like Shutterfly.com, Snapfish.com, and iPhoto offer endless book design options. You can insert personalized text, choose photo size, page color and font, and crop and scale your images as desired. If you’re design challenged, all offer failsafe templates for the perfect photobook every time.
Another source, blurb.com, lets you convert your photobook to an ebook for the iPad or use their Blurb BookShow to share your book on a blog, website, or Facebook page.
Photo tchotchkes
Calendars, mugs, t-shirts, totes, stationary, iPhone cases and more. There are endless options for printing and displaying your favorite photos—many which make terrific Mother’s Day, Father’s Day and grandparent gifts.
But remember, while you may never tire of seeing images of your family, the rest of the world has a threshold. Advises one interior designer (who wishes to remain nameless), family photos are not fine art and should never be treated as such.
 Getting photos on your walls
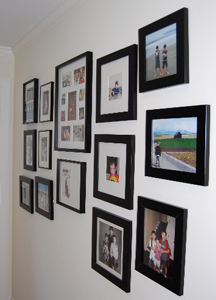
Photo collages. Think of your family photos as a collection, and display them as such. Instead of hanging a few photos in the upstairs hallway, create a floor to ceiling wall collage. Use the same frame in the same color but in different sizes; that way your eye is drawn to the photos not the framing. And before you pound a nail, lay out your collage on the floor to make sure you’ve got the perfect arrangement.
Photo canvases. You may be tempted to go “Andy Warhol” with your child’s photo, but just remember our designer’s rule. One mom took photos of the family dogs and had them made into photo canvases for a child’s room.
Small frames. Nothing accessorizes your bookshelves and bedside table better than artful photo frames exhibiting your favorite family memories.
Milestone photos. Instead of buying the school photos every year, one mom made the investment in fine black and white portraits at each of her child’s major developmental milestones (baby, toddler, elementary school before the baby teeth fall out, 8th grade and high school senior). The portraits were framed and displayed as a collection in the master bedroom.